What is Transport Layer Security (TLS)?
Transport Layer Security cryptographic protocol that provides end-to-end security, or TLS is a widely adopted security protocol designed to facilitate privacy and data security for communications over the Internet. TLS is encrypting the communication between web applications and servers, such as web browsers loading a website. TLS can also be used to encrypt other communications such as email, messaging, and voice over IP (VoIP).
TLS was proposed by the Internet Engineering Task Force (IETF), an international standards organization, and the first version of the protocol was published in 1999. The most recent version is TLS 1.3, which was published in 2018.
Why should businesses and web applications use the TLS protocol?
TLS encryption can help protect web applications from data breaches and other attacks. Additionally, TLS-protected HTTPS is quickly becoming a standard practice for websites. For example, the Google Chrome browser is cracking down on non-HTTPS sites, and everyday Internet users are starting to become more wary of websites that do not feature the HTTPS padlock icon.
There are three main components to what the TLS protocol accomplishes:
Encryption: hides the data being transferred from third parties.
Authentication: ensures that the parties exchanging information are who they claim to be.
Integrity: verifies that the data has not been forged or tampered with.
How to Check TLS is enabled or not?
1: Internet Explorer: Open Internet explorer options> Advanced tab>scroll down to the Security section. Check the User TLS 1.2 checkbox is enabled or disabled.
2: Registry Key:
Step A: Press Windows + R to open Run window, type regedit in the empty box and click OK to run Registry Editor.
Step B: Go ahead according to the following path:
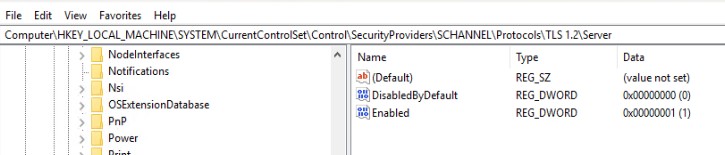
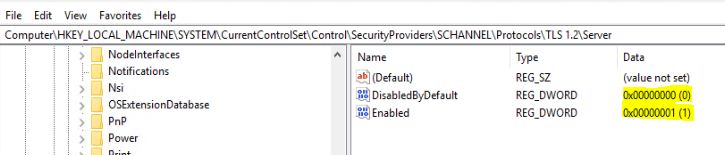
Computer > HKEY_LOCAL_MACHINE > SYSTEM > CurrentControlSet > Control > SecurityProviders > SCHANNEL > Protocols > TLS 1.2
How to Enable it if there is no entry?
1: Go to Regedit>Computer > HKEY_LOCAL_MACHINE > SYSTEM > CurrentControlSet > Control > SecurityProviders > SCHANNEL > Protocols
2: Right-click the Protocols folder, select New and then select Key from the context menu. Name the new key as TLS 1.2 and click it to expand.

3: Add 2 new keys underneath TLS 1.2 and name the keys as Client and Server.
4: Right-click Client key and select New > DWORD (32-bit) Value from the context menu. Then name the DWORD as DisabledByDefault.
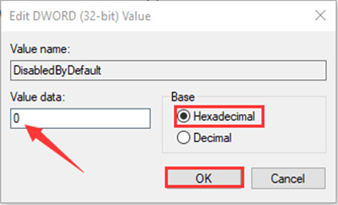
5: Right-click the new DWORD and select Modify from the drop-down menu, check that the Value data is set to 0 and the Base is Hexadecimal. Then click OK.
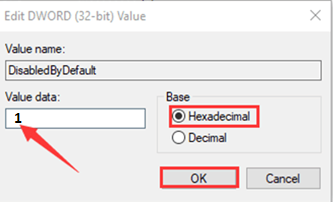
6: Create another DWORD for the Client key as the Step 5 and name it as Enabled. Check the Base and Value data again, but the value should be 1 this time.
7: Refer to Step 5 to 7 to create two DWORDs for the Server key, respectively named DisabledByDefault and Enabled again.
8: Close the Registry Editor and restart your Windows Server.
Disable TLS Older Versions
Go to Regedit>Computer > HKEY_LOCAL_MACHINE > SYSTEM > CurrentControlSet > Control > SecurityProviders > SCHANNEL > Protocols> TLS 1.0/TLS 1.1 > Server >
Set the Value 1 for DisabledByDefault and Set Value 0 for Enabled.
Downloads the above registry key and push it on the server where you want to enable the TLS 1.2.